
Are you tired of cluttered kitchen countertops and disorganized spice collections? Making a DIY spice rack from recyclable materials is a smart way to reuse old items. It adds a personal touch to your kitchen.
By using materials you might throw away, you can make a unique storage spot. This project is good for the planet and fun to do.
With a bit of creativity, you can transform old stuff into a beautiful kitchen organization system. Let’s dive into making your own DIY spice rack with recyclable materials.
The Benefits of Creating Your Own Spice Rack
Making your own spice rack is a great way to upcycle materials, save money, and make your kitchen look better. It’s not just about organizing your spices. It’s also about living more sustainably.
Environmental Impact of Upcycling
Using old materials for your spice rack helps the planet. You can turn old pallets, cardboard tubes, or glass jars into something new. This way, you’re reducing waste and helping the environment.
Cost Savings Compared to Store-Bought Options
Building your own spice rack can save you money. Instead of buying expensive racks, use items you already have or find cheap ones. This way, you can save money and still have a great spice rack.
Customization Possibilities for Your Kitchen
With a DIY spice rack, you can make it exactly how you want. Choose the size, material, and design that fits your kitchen perfectly. It’s a great way to add your personal touch.
Space Optimization Benefits
A custom spice rack can make your kitchen more efficient. You can design it to fit in small spaces or use areas you never thought of before. It’s a smart way to use every inch of your kitchen.
By making your own spice rack, you get to enjoy many benefits. You’ll upcycle materials, save money, customize your space, and optimize your kitchen. It’s a win-win for your kitchen and the planet.
Essential Recyclable Materials for Your DIY Spice Rack
Before starting your DIY spice rack, let’s explore recyclable materials. These materials help reduce waste and add a unique touch to your kitchen.
Cardboard Options
Cardboard is versatile and easy to find. You can use it for the structure or as a backing for your spice rack.
Plastic Containers and Bottles
Plastic containers and bottles are waterproof. They’re great for storing spices and come in various sizes. You can easily label them.
Glass Jars and Containers
Glass jars are perfect for storing spices. They’re non-porous, keeping spices fresh. Plus, they’re easy to clean and reuse.
Wood Scraps and Pallets
Wood scraps and pallets make a rustic spice rack. Sand and stain them to match your kitchen decor.
Metal Cans and Tins
Metal cans and tins are durable and modern. Paint or label them for easy spice identification.
| Material | Advantages | Potential Uses |
|---|---|---|
| Cardboard | Easily accessible, versatile | Structure, backing |
| Plastic Containers | Waterproof, various sizes | Spice storage |
| Glass Jars | Non-porous, easy to clean | Spice storage |
| Wood Scraps | Rustic look, sturdy | Frame, shelves |
| Metal Cans | Durable, modern look | Spice containers |
Tools and Additional Supplies You’ll Need
To start your spice rack project, you’ll need some basic tools and materials. Having the right supplies makes the assembly easier and faster.
Basic Tools for Assembly
For assembling your spice rack, you’ll need some basic tools. These include:
- Screwdriver: For driving screws and other fasteners.
- Hammer: For tapping pieces into place.
- Pliers: For gripping and bending various objects.
- Utility knife: For cutting various materials.
Adhesives and Fasteners
To keep your spice rack together, you’ll need adhesives and fasteners. You can use:
- Wood glue: For bonding wood pieces.
- Nails or screws: For added structural integrity.
- Hot glue: For attaching decorative elements or reinforcing joints.
Decorative Elements
To make your spice rack unique, add decorative elements like:
- Paint or stain: To match your kitchen decor.
- Decorative knobs or handles: For easy access and visual appeal.
- Stickers or decals: For a personalized touch.
Safety Equipment
When working on your DIY project, safety is key. Make sure to have:
- Safety glasses: To protect your eyes from debris.
- Work gloves: To prevent injuries and improve grip.
- Dust mask: To avoid inhaling dust and particles.
Measuring and Marking Tools
Accurate measurements are crucial for a successful DIY project. Ensure you have:
- Tape measure: For measuring lengths and widths.
- Pencil or marker: For marking cuts and drill points.
- Level: To ensure your spice rack is properly aligned.
By gathering these tools and supplies, you’ll be ready to assemble your DIY spice rack. You’ll enjoy the benefits of a customized kitchen organizer.
Planning Your DIY: Spice Rack with Recyclable Materials
Before starting your DIY spice rack, planning is key. It must fit your kitchen and meet your needs. Effective planning involves several key steps to create a spice rack that looks good and works well.
Measuring Your Space
Start by measuring the spot for your spice rack. Note the height, width, and depth. This tells you the biggest size your project can be.
Determining Capacity Needs
Look at your spice collection to figure out how many containers you need. Think about the sizes and how much space you need. This makes sure your rack is just right for your spices.
Sketching Your Design
With your measurements and spice needs in mind, draw a basic design. Think about the materials and how they’ll fit together. A simple sketch helps you see the final product and spot any problems early.
Preparing Your Materials
After designing, start getting your recyclable materials ready. Clean and sort them based on your design. This step is important for a smooth build.
Creating a Materials Checklist
Make a list of materials and tools you’ll need. Include all recyclable materials, adhesives, fasteners, and any decorations. A checklist prevents last-minute trips or missing something important.
By following these steps, you’ll make a DIY spice rack that’s both useful and stylish for your kitchen.
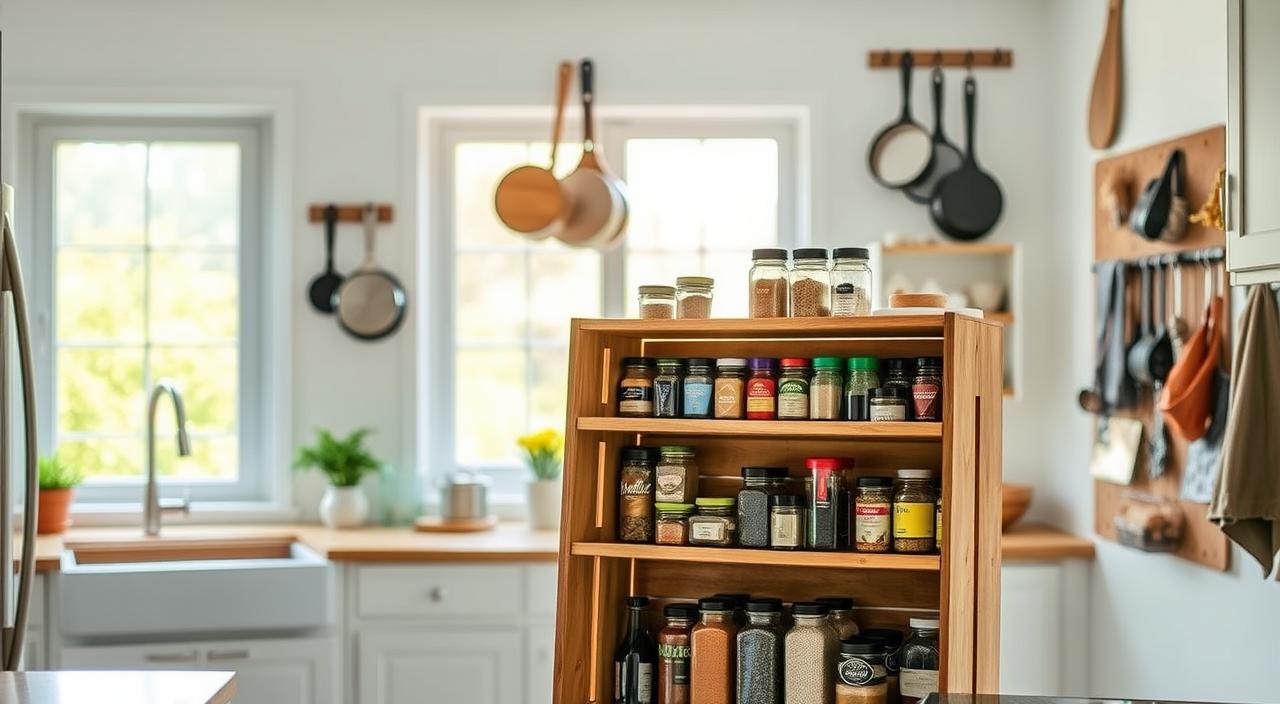
5 Popular Spice Rack Designs Using Recyclables
Your kitchen can look better with a spice rack made from recycled materials. Making a spice rack from recyclables is good for the planet and adds a personal touch. It makes your kitchen more unique.
Wall-Mounted Pallet Spice Rack
A pallet spice rack is a smart use of old pallets. You can break it down, clean it, and build a rack. It saves space and brings a rustic feel to your kitchen.
Tiered Cardboard Countertop Organizer
Cardboard is a cheap and green way to make a countertop organizer. Cut out different sizes, stack them, and hold them together. It’s great for small kitchens.
Hanging Mason Jar Spice Storage
Mason jars are great for a hanging spice rack. Fill them with spices, add a metal ring or twine, and hang them. It adds a cozy touch to your kitchen.
Repurposed Tin Can Magnetic Spice Rack
Old tin cans can become a magnetic spice rack. Clean them, attach magnets, and stick them to your fridge. It’s perfect for small kitchens.
Upcycled Drawer Pull-Out Spice System
Turn an old dresser into a spice pull-out. Add dividers and small containers for spices. It saves space and keeps spices handy.
| Design | Materials | Space Savings |
|---|---|---|
| Wall-Mounted Pallet Spice Rack | Old pallets, nails | High |
| Tiered Cardboard Countertop Organizer | Cardboard, glue | Medium |
| Hanging Mason Jar Spice Storage | Mason jars, twine or metal rings | High |
| Repurposed Tin Can Magnetic Spice Rack | Tin cans, magnets | Low |
| Upcycled Drawer Pull-Out Spice System | Old drawer, dividers, containers | High |
These designs offer creative ways to store spices using recyclables. Choosing the right design can make your kitchen more organized and eco-friendly.
Step-by-Step Instructions: Wall-Mounted Pallet Spice Rack
With a few simple tools and some creativity, you can turn a pallet into a practical spice storage solution. This project not only upcycles waste material but also adds a rustic touch to your kitchen.
Preparing Your Pallet Wood
The first step in creating your wall-mounted pallet spice rack is preparing the pallet wood. This involves two crucial steps: disassembling the pallet and cleaning and sanitizing the wood.
Disassembling the Pallet
Carefully dismantle the pallet into individual planks. This can be done using a hammer and a pry bar. Be cautious to avoid damaging the wood.
Cleaning and Sanitizing
Once disassembled, clean the planks thoroughly to remove any dirt or debris. Sanitizing is also essential to ensure the wood is free from any contaminants that could affect your spices.
Cutting and Sanding the Pieces
After preparing the pallet wood, cut the planks into the required sizes for your spice rack. Sanding the cut pieces is crucial to smooth out any rough edges and ensure a uniform finish.
Safety first: Always wear protective gear, including gloves and safety glasses, when cutting and sanding wood.
Assembling the Frame
Assemble the cut pieces into a frame that will serve as the base of your spice rack. Use a sturdy adhesive or nails to secure the pieces together.
Adding Shelves and Dividers
Add shelves and dividers within the frame to create compartments for your spices. This step is crucial for maximizing storage and keeping your spices organized.
Mounting Hardware Installation
Finally, install the mounting hardware to hang your spice rack on the wall. Ensure the hardware is sturdy enough to support the weight of the rack and your spices.
By following these steps, you can create a functional and attractive wall-mounted pallet spice rack. It not only organizes your spices but also adds a unique element to your kitchen decor.
Step-by-Step Instructions: Tiered Cardboard Organizer
We’ll show you how to make a tiered cardboard organizer that’s useful and eco-friendly. It’s great for those who want to upcycle and add a personal touch to their kitchen.
Selecting and Preparing Cardboard
First, pick sturdy cardboard for your project. Choose boxes or sheets that are clean and dry. Remove any creases or folds by flattening the cardboard and letting it sit under a heavy object for a few hours.
Cutting the Base and Tiers
Next, cut out the base and tiers using a craft knife or scissors. Make sure the pieces are a bit bigger than needed. Use a ruler or measuring tape to get straight cuts.
Reinforcing the Structure
To make your organizer stable, reinforce it. Use glue or tape to attach the tiers to each other and the base. Make sure the corners are secure to avoid collapse.
Assembling the Tiers
Put the tiers together by attaching them to the base and each other. Use a level to keep them even. Tighten any loose parts to prevent it from falling over.
Waterproofing and Finishing
To keep your organizer dry, apply a waterproof coating. You can use varnish, polyurethane, or a waterproof spray. Follow the manufacturer’s instructions for application and drying times.
| Material | Purpose | Tips |
|---|---|---|
| Cardboard | Base and tiers | Use sturdy, clean cardboard |
| Glue or tape | Reinforcing structure | Apply evenly and securely |
| Waterproof coating | Protecting from moisture | Follow manufacturer’s instructions |
Organizing Your Spices Effectively
Keeping your kitchen tidy starts with organizing your spices. A tidy spice rack makes cooking easier and more fun.
Categorization Systems
There are many ways to organize your spices. You can sort them by type, like baking or international spices. Or, you can arrange them alphabetically for quick finds. You can also put your favorites in easy spots.
Labeling Methods
It’s important to label your spices clearly. Use adhesive labels or a label maker for easy-to-read labels. Keep your labels the same for all spices.
Accessibility Considerations
Put your most used spices where you can easily reach them. Think about the spice rack’s height and how easy it is to get to the spices. Store less used spices at the back or on higher/lower shelves.
Rotation and Freshness Tips
To keep spices fresh, use a rotation system. Store them in a cool, dark spot and use airtight containers. Check expiration dates and replace old spices often.
With these tips, your kitchen will be more organized and useful.
Customizing Your Spice Rack
Now that you’ve built your spice rack, it’s time to make it truly yours. You can add some creative touches to make it look and work better.
Painting and Decorating Techniques
Painting is a simple way to customize your spice rack. Use eco-friendly paint to keep your project green. Pick colors that match your kitchen or stand out.
Eco-Friendly Paint Options
Choose paints low in VOCs for a healthier home. Benjamin Moore’s Natura and Sherwin-Williams’ ProMar 200 are good choices.
Stenciling and Detailing
Stencils can add a personal touch. Try stenciling spice names, patterns, or quotes to make your rack unique.
Adding Labels and Organization Systems
Good labeling is key for a useful spice rack. Use a label maker or chalkboard labels. Organize spices by type, use, or alphabetically.
Incorporating Lighting Elements
LED strip lighting under shelves or around the frame adds drama. It also helps you find spices easily.
Personalizing with Unique Features
Think about what makes your spice rack special. Add a small drawer for rare spices or a magnetic strip for small containers.
With these ideas, your spice rack will be both functional and beautiful. It will show off your style and add to your kitchen’s charm.
Troubleshooting Common DIY Spice Rack Issues
Building a DIY spice rack is just the start. It’s important to be ready for any problems that might come up. Even with good planning, things can still go wrong.
Fixing Structural Weaknesses
If your spice rack feels shaky or weak, you need to find and fix the problem. Make sure the base is solid and the shelves are straight. You can make it stronger by adding brackets or using better glue.
Addressing Moisture and Durability Problems
Moisture can be a big problem, especially if your rack is near where you cook. Use materials that won’t get damaged by water or apply a waterproof coating. Check your rack often for damage and replace parts as needed.
Solving Mounting Challenges
Mounting your spice rack can be tricky. If it’s hard to get it to stick to the wall, try using wall anchors. Or, ask a pro for advice on the right hardware for your situation.
Repairing Damaged Components
Parts can get damaged for many reasons, like bad materials or accidents. Figure out if you can fix it or if you need to replace it. For small problems, a quick fix might work. But big damage might mean you need a new part.
Adapting Your Design for Unexpected Issues
Even with careful planning, your spice rack might not work as you hoped. Be ready to make changes. You might need to change the layout, add more support, or even start over with a new design.
| Issue | Common Cause | Solution |
|---|---|---|
| Structural Weakness | Insufficient support or poor material quality | Reinforce with brackets or upgrade materials |
| Moisture Damage | Proximity to cooking areas or lack of waterproofing | Apply waterproof coating or relocate |
| Mounting Difficulties | Inadequate wall anchors or incorrect mounting hardware | Use appropriate wall anchors or consult a professional |
Conclusion
You’ve made a useful and green spice rack from recyclable stuff. This DIY project cuts down on waste and makes your kitchen more personal.
Looking back, you’ve saved money, made storage that fits you, and helped the planet. This spice rack summary shows how upcycling makes cooking better.
Now, try more upcycling projects to give old stuff a new life. Your kitchen will get even more unique. You’ve learned skills for more DIY projects, making your home more eco-friendly and creative.
Keep upcycling and making things, and your kitchen will stand out. This DIY project is just the start of your journey. We hope you’ll show off your work and inspire others to live more sustainably.
Yenny Monroe is a content creator passionate about lifestyle, fashion, and everything that inspires authenticity.